
|
You are here : CRM > Sales Order Maintenance > Quotation Entry Quotation Entry
|
Raise Quotations against Inquiries generated by Customers OR directly without any Inquiry reference through this option.
Further a Sales Order can be received against a Quotation. A Quotation can neither be edited nor deleted once a Sales Order is received against it.
Enter any text you want to search in the list below. The search is applicable to all columns of the list. Once the text is entered, press <ENTER> key. As a result, the list will be refreshed with all those records that contain the entered text fully or partially. In order to go back to the original list, remove the text from the box and press <ENTER> key again.
IMMS provides the facility to filter the records on the basis of their status. Click on the field and select either 'All', 'Authorized' or 'Pending for Authorization'. Selecting 'All' will display all records, authorized as well as unauthorized. Selecting 'Authorized' will display only authorized records. Selecting 'Pending for Authorization' will display only those records that are yet to be authorized.
|
Once a Quotation is generated, it may or may not need to be authorized. Authorization of Quotation is a flag driven option. Therefore its availability depends upon the setting of the 'Authorization Required' flag through Document Control Master option
 in Administrator Tools Module. in Administrator Tools Module.  Read more... Read more... |
 Quotations can be added, edited, and viewed provided the Role associated with the currently logged-in user through User Management has the respective rights to do so.
To 'Add' a Quotation, click on the  button and to 'Edit', click on the
  icon on its corresponding record. To view details of a particular Quotation, <DoubleClick> on that record. As a result, following screen will be displayed -

You can 'Add' or 'Edit' a Quotation but you can not 'Delete' it.

In case of 'Edit' and 'View' modes, one of the options will be displayed as highlighted for the selected record. It can not be changed.
While 'Adding', click on 'With Inquiry Reference' button if you want to generate Quotation against an existing Inquiry by a Customer. Click on 'Without Inquiry Reference' if you want to generate direct Quotation i.e., WITHOUT any Inquiry reference.
In case 'With Inquiry Reference' is chosen, following options will be displayed -
Reference Inquiry
Customer Name:
Specify the Customer who has raised Inquiry.
Click on the
icon on the field to access a list of already existing Customers defined through Customer Master option. Select your desired Customer from the list by scrolling down to it and click on 'Continue' button. Alternatively you can also enter the Customer Code. Press <TAB>.
Please note that the help list will display Customers of only those Inquiries against which Quotations have not been raised yet.
You can not select a Customer that has been deactivated through Activate/De-Activate Master option in Administrator Tools Module. The help will also not display such Customers.
Salesman Name:
Specify the Salesman of the Inquiry for which Quotation is to be generated.
Click on the field to access a list of already existing Employees defined through Employee Master option of Administrator Tools Module. Select your desired Employee from the list by scrolling down to it and pressing <ENTER>. Alternatively you can also enter the Employee . Press <TAB>.
Please note that the help list will display Salesmen of only those Inquiries against which Quotations have not been raised yet. Inquiries belonging to the selected Customer will be considered only.
Click on button to populate the grid with Inquiry details as follows -

Please note this grid will display Inquiries belonging to the selected Customer and received by the selected Salesman only. Moreover, Inquiries belonging to only those Sites will be displayed for which the logged-in user has the rights to access. Inquiries that have been closed through Inquiry Close Entry option will not be considered here.
Click on the row belonging to the desired Inquiry Number in order to enter its Quotation details.
Click on button to discard the selection and go back to the previous screen. Click on button to go back to the previous screen. As a result certain data related to the selected Inquiry will be displayed automatically in the parent screen as follows -
Inquiry Year:
Automatically displays the Year of the selected Inquiry Number for your reference.
Inquiry Group:
Automatically displays the Group of the selected Inquiry Number for your reference.
Inquiry Site:
Automatically displays the Site of the selected Inquiry Number for your reference.
Inquiry Number:
Automatically displays the selected Inquiry Number for your reference.
Inquiry Date:
Automatically displays the Date of the selected Inquiry Number for your reference.

This section stores the details related to the Quotation as follows -
Quote To:
Denotes the Customer for whom Quotation is generated.
While 'Adding',
- In case the Quotation is raised against an Inquiry, this field will automatically display the Customer Code of the selected Inquiry . You can NOT change it.
- In case its a direct Quotation, click on the
In case of 'Edit' and 'View', Quote To will be displayed automatically for the selected record. It can not be changed.
You can not select a Customer that has been deactivated through Activate/De-Activate Master option in Administrator Tools Module. The help will also not display such Customers.
Bill To:
Denotes the Customer to whom the Quotation will be billed to.
While 'Adding', the Customer selected in 'Quote To' field will be displayed by default. You can change it.
In case of 'Edit' and 'View' modes, the Quote To will be displayed automatically for the selected record. You can change it in 'Edit' mode.
To add or edit Bill To, click on the
You can not select a Customer that has been deactivated through Activate/De-Activate Master option in Administrator Tools Module. The help will also not display such Customers.
Quotation Year:
Denotes the Year of Quotation
While 'Adding', current financial year will be displayed by default. You can NOT change it.
In case of 'Edit' and 'View', Quotation Year will be displayed automatically for the selected record. You can not change it.
Quotation Group:
Specify the Group of the Quotation.
While 'Adding', please note that the Group which has been specified as default for the selected financial year through Document Control Master
option in Administrator Toolswill be displayed automatically.
Click on the field to access a list of already defined Quotation Groups for the entered Year though Document Control Master option in Administrator Tools Module. Select your desired Group from the list by scrolling down to it and pressing <ENTER>. Alternatively you can also enter the Group.
In case of 'Edit' and 'View', Quotation Group will be displayed automatically for the selected record. You can not change it.
Quotation Site:
Denotes the Site of Quotation.
In case the Quotation is raised against an Inquiry, this field will automatically display the Site Code of the selected Inquiry Number. You can NOT change it.
In case its a direct Quotation, specify the Site of the Quotation. By default the Site if any specified with the selected Group
Please note that only those Sites will be displayed/accepted for which the logged-in user has the rights to access.
In case of 'Edit' and 'View', Quotation Site will be displayed automatically for the selected record. You can not change it.
Quotation Number:
(Type : Alphanumeric, Length : 6)
Denotes the Number of Quotation.
While 'Adding', Quotation Number is either generated automatically or entered manually by the user.
In case of 'Edit' and 'View', Quotation Number will be displayed automatically for the selected record. You can not change it.
Quotation Rev. No:
While 'Adding' a new Quotation or 'Editing' a non-authorized Quotation, this field will automatically display '0'. You can NOT change it.
Quotation Rev. Date:
Specifies the Date of Quotation.
While 'Adding' a new Quotation, enter the Date of Quotation revision. It should fall within the current period date range.
In case of 'Edit' and 'View', Date will be displayed automatically for the selected Quotation Number. You can NOT change it in 'Edit' mode.
Salesman:
Specify the Salesman of the Quotation.
While 'Adding',
- In case the Quotation is raised against an Inquiry, this field will automatically display the Salesman Code of the selected Inquiry . But you can change it if required. To do click on the field.
- In case its a direct Quotation, the Salesman specified for the selected Customer through Customer Master option will be displayed by default. But you can change the Salesman. To do so, click on the field to access a list of already existing Employees defined through Employee Master option of Administrator Tools Module. Select your desired Employee from the list by scrolling down to it and pressing <ENTER>. Alternatively you can also enter the Employee . Press <TAB>.
In case of 'Edit' and 'View', the Salesman of the selected Quotation Number will be displayed automatically. You can change it.
Validity (Days):
(Type : Numeric, Length : 3)
Denotes the number of days for which the Quotation is valid.
While 'Adding' a new Quotation, by default the Quotation will be valid for 30 days. You can change it.
In case of 'Edit' and 'View', Validity will be displayed automatically for the selected Quotation Number. You can change it in 'Edit' mode.
Customer Inquiry Reference:
(Type : Alphanumeric, Length : 255)
Denotes the Inquiry Reference Number against which Quotation is being made.
While 'Adding' a new Quotation, enter the Customer's Inquiry Reference against which the Quotation is being raised.
In case of 'Edit' and 'View', Customer Inquiry Reference will be displayed automatically for the selected Quotation Number. You can change it in 'Edit' mode.
Inquiry Reference Date:
Denotes the Inquiry Reference Date.
While 'Adding' a new Quotation, enter the Customer's Inquiry Reference Date. It can not be later than the quotation Date.
In case of 'Edit' and 'View', Inq Ref Date will be displayed automatically for the selected Quotation Number. You can change it in 'Edit' mode.
Exchange Rate:
Automatically displays the latest Exchange Rate (selling) of the selected Currency as specified through Exchange Rate Master Entry option in Administrator Tools Module. You can not change it as it is for your reference purpose only.
Quotation Type:
Denotes the type of Sales Order for which Quotation is generated.
While 'Adding', select whether the Sales Order is a 'Regular Sales Order', 'Sales in Transit Order' or 'High Sea Sales Order' by selecting the appropriate option from the given popup.
In case of 'Edit' and'View', the type of Sales Order will be displayed automatically for the selected Quotation Number. You can change it in 'Edit' mode.
Customer Project Name:
(Type : Alphanumeric, Length : 40)
While 'Adding', enter the Customer's Project Name.
In case of 'Edit' and 'View', Customer Project Name will be displayed automatically for the selected Quotation Number. You can change it in 'Edit' mode.
Is Agent Associated with this Quotation?
While 'Adding', turn this flag 'On' by clicking on it if there is an Agent associated with the Quotation. Turn the flag 'Off' if there is no Agent involved.
In 'Edit' and 'View' modes, the status of this flag will be displayed as 'On' or 'Off' as per the selected Quotation Number. You can change it in 'Edit' mode.
Agent Name:
Denotes the Agent associated with the Quotation.
While 'Adding' a new Quotation, click on the field to access a list of Agents defined through Vendor Master option of Purchase Module. Select your desired Agent from the list by scrolling down to it and pressing <ENTER>. Alternatively you can also enter the Agent. Press <TAB>.
In case of 'Edit' and 'View', Agent Name will be displayed automatically as per the selected Quotation No. You can change it.
Bank Information
Specify the Bank information for Quotation as follows -
Bank Book:
Denotes the Bank.
While 'Adding' a new Quotation, click on the field to access a list of Bank Books defined through Book Master Maintenance option of Finance Module. Select your desired Bank Book from the list by clicking on it. Alternatively you can also enter the Book. Press <TAB>.
In case of 'Edit' and 'View', Bank Book will be displayed automatically as per the selected Quotation No. You can change it.
Bank A/C No:
Automatically displays the Account Number of the selected Bank for your reference. It can not be changed.
Bank Name:
Automatically displays the Name of the selected Bank for your reference. It can not be changed.
Address:
Automatically displays the Address of the selected Bank for your information. It can not be changed.

This section automatically displays the Address and contact details of the selected Customer as entered through Customer Master option for your reference. You can NOT change them here.
This section automatically displays the details of Contact Persons of the selected Customer as entered through Customer Master option for your reference. You can NOT change them here.
A grid will be displayed as follows -

Click on  button to enter more Sales Items in the grid. As a result, a new row will
added in the end of the grid.
button to enter more Sales Items in the grid. As a result, a new row will
added in the end of the grid.
Also please note that the Rate Structure Code of the previous row will be carried forward and displayed in the new row as well.
While 'Adding' a new Quotation,
In case of 'Edit'and'View', this grid will be populated and displayed with Sales Items belonging to the selected Quotation Number.
Field Description of the grid -
Action
Click on the
icon to remove a record from the grid. Click on the 'Delete' icon again to un-delete the record.
Sr. No:
Automatically generated sequence number for each Item.
Cust. PO Item SrNo:
(Type : Alphanumeric, Length : 5)
While 'Adding' a new Quotation,
In case the Quotation is raised against an Inquiry, this field automatically displays the Sales Item serial number in Customer's PO as specified for the selected Inquiry Number. You can change it. Click on the field. Enter the Item Serial Number followed by <TAB>.
In case its a direct Quotation, click on the field. Enter the Item Serial Number as mentioned in the Customer's Purchase Order followed by <TAB>.
In case of 'Edit'and'View', Cust PO Item SrNo will be displayed automatically as per the selected Quotation Number. You can change it.
Application Code:
Denotes the Application for Sales Quotation.
While 'Adding' a new Quotation,
In case the Quotation is raised against an Inquiry, the Application Code entered while raising the Inquiry for the Sales Item will be displayed automatically. if NO Application Code was entered while raising the Inquiry, IMMS provides the facility to enter it for the Quotation. Press <TAB>.
If a new Sales Item is being added to the Quotation, this field will be displayed blank. You can enter the Application Code or leave the field blank as per requirement.
In case its a direct Quotation, this field will be displayed blank. You can enter the Application Code or leave the field blank as per requirement.
To enter Application Code, click on the field to access a list of already existing Applications defined through Codes Master - Entry (Code Type = 'SQ') option of Administrator Tools Module. Select your desired Code from the list by scrolling down to it and pressing <ENTER>. Alternatively you can also enter the Application Code. Press <TAB>.
In case of 'Edit'and'View', Application Code will be displayed automatically as per the selected Quotation Number. You can change it in 'Edit' mode.
Application Name:
Name of the selected Application Code will be displayed automatically.
But in case the Quotation is raised against an Inquiry and Application Code was left blank in the selected Inquiry, than the Application entered while raising the Inquiry for the Sales Item will be displayed automatically.
Model No:
In case the Quotation is raised against an Inquiry, displays the Model Number for the Sales Item as specified for the selected Inquiry Number. You can not change it.
If a new Sales Item is being added to the Quotation, Model Number for the selected Sales Item as specified through Sales Item Master : Product/Spares OR Sales Item Master : Service option will be displayed automatically. You can not change it.
In case its a direct Quotation, automatically displays the Model Number for the selected Sales Item as specified through Sales Item Master : Product/Spares OR Sales Item Master : Service option. You can not change it.
Sales Item Code:
Denotes the Sales Item.
While 'Adding' a new Quotation,
In case the Quotation is raised against an Inquiry, this field displays the Sales Item Codes belonging to the selected Inquiry Number. You can NOT change it.
But if you are adding a new Sales Item to the Quotation, click on the
You can not select an Item that has been deactivated through Activate/De-Activate Master option in Administrator Tools Module. The help will also not display such Items.
In case its a direct Quotation, click on the
You can not select an Item that has been deactivated through Activate/De-Activate Master option in Administrator Tools Module. The help will also not display such Items.
In case of 'Edit'and'View', Sales Item will be displayed automatically as per the selected Quotation Number. You can change it only if its a direct Quotation.
Sales Item Description:
Displays the Description for the Sales Item Code. You can not change it.
Customer Item Code:
(Type : Alphanumeric, Length : 100)
Displays the Customer's Item Code for the Sales Item.
While 'Adding' a new Quotation,
In case the Quotation is raised against an Inquiry, the Customer Item Code entered while raising the Inquiry for the Sales Item will be displayed automatically. if NO Customer Item Code was entered while raising the Inquiry, IMMS provides the facility to enter it for the Quotation. Click on the field. Enter the Customer Item Code followed by <TAB>.
If a new Sales Item is being added to the Quotation, the Customer Item Code for the combination of selected Customer Code and Sales Item Code entered through Item Customer Master option will be displayed by default. If it has not been entered, this field will be displayed blank. You can either enter or change the Customer Item Code or leave the field blank.
In case its a direct Quotation, the Customer Item Code for the combination of selected Customer Code and Sales Item Code entered through Item Customer Master option will be displayed by default. If it has not been entered, this field will be displayed blank. You can either enter or change the Customer Item Code or leave the field blank.
In case of 'Edit' and'View', Customer Item Code will be displayed automatically as per the selected Quotation Number. You can NOT change it.
Customer Item Name:
(Type : Alphanumeric, Length : 255)
Displays the Name of the Customer's Item Code.
While 'Adding' a new Quotation, click on the field. Now enter the Name for the Customer's Item Code. Press <TAB>.
In case of 'Edit' and'View', Customer Item Name will be displayed automatically as per the selected Quotation Number. You can NOT change it.
Qty(IUOM):
Automatically converts and displays the Quantity entered in Sales UOM into Internal UOM. You can not change it.
IUOM:
Displays the Internal Unit of Measurement of the Sales Item as specified through Item Master Basic Details - Entry option of Materials Module for your reference purpose. It can NOT be changed.
Qty(SUOM):
(Type : Numeric, Length : 9.2)
While 'Adding' a new Quotation,
In case the Quotation is raised against an Inquiry, automatically displays the Quantity of Inquiry for the Sales Item as specified for the selected Inquiry Number. You can change it as per the requirement of the Quotation. Click on the field to do so. Enter the quantity followed by <TAB>.
In case its a direct Quotation or a new Sales Item is being added to the Quotation, click on the field. Now enter the quantity followed by <TAB>.
In case of 'Edit'and'View',
Qty (SUOM) will be displayed automatically as per the selected
Quotation Number.
SUOM:
Displays the Sales Unit of Measurement of the Sales Item as specified through Sales Item Master : Product/Spares or Sales Item Master : Service option for your reference purpose. It can not be changed.
Curr Code:
Automatically displays the Currency Code mentioned in Basic Details tab. You can NOT change it.
Basic Price (IUOM):
Automatically converts and displays the Basic Price entered in Sales UOM into Internal UOM by using Conversion Factor entered for the Sales Item through Sales Item Master : Product/Spares or Sales Item Master : Service option. You can not change it.
Basic Price (SUOM):
(Type : Numeric, Length : 8.4)
While 'Adding' a new Quotation,
In case the Quotation is raised against an Inquiry, this field automatically displays the Basic Price (in Sales Unit of Measurement) of the Sales Item as entered through the selected Inquiry Number. You can change it as per the requirement of the Quotation. Click on the field to do so. Enter the Price followed by <TAB>.
If a new Sales Item is being added to the Quotation -
If the Quotation is being prepared in the Customer's Currency, this field automatically displays the Basic Price of the Sales/Service Item.
The Basic Price of the Sales Item depends upon the setting of flag 'In Sales Quotation/Order, Sales Item Rate to be picked up from' You can change it as per the requirement of the Quotation. Click on the field to do so. Enter the Price followed by TAB>.
In case its a direct Quotation -
If the Quotation is being prepared in the Customer's Currency, this field automatically displays the Basic Price of the Sales/Service Item.
The Basic Price of the Sales Item depends upon the setting of flag 'In Sales Quotation/Order, Sales Item Rate to be picked up from' You can change it as per the requirement of the Quotation. Click on the field to do so. Enter the Price followed by <TAB>.
In case of 'Edit'and'View', Basic Price (SUOM) will be displayed automatically as per the selected Quotation Number. You can change it.
Item Basic Amt:
Automatically calculates and displays the Basic Amount of the Sales Item as Basic Price (SUOM) * Qty (SUOM). You can not change it.
Disc. Type:
Additional Discounts provided on each Item to the Customer can be entered through this field. Click on the field. Another grid will be displayed as follows -
In 'Add' mode, if the Discount for the selected Customer have already been mentioned through Item Customer Master option, this grid will automatically display them. But if no discounts have been mentioned, this grid will be displayed as blank.
In 'Edit'and 'View' modes, this grid will be populated and displayed previously entered Discounts entered if any for the selected Quotation.
Click on
Field Description of the grid -
Action
Click on the
Discount Code:
Click on the field to access a list of already existing Dealer Discounts defined through Codes Master Entry (Code Type = 'DD') option of Administrator Tools Module. Select your desired Discount from the list by scrolling down to it and pressing <ENTER>. Alternatively you can also enter the Discount Code.
Discount Name:
Name of the selected Discount Code will be displayed automatically.
Discount Type:
Discount can be offered in either percentage or value. Select 'Percentage' or 'Value' from the given popup. Press <TAB>.
Discount Value:
Click on the field. Now enter discount value either in percentage or amount as the case may be. Press <TAB>.
Once done, click on ' OK' button to save the entered Discount details or 'Cancel' to discard them. In both the cases, the control goes back to the previous grid.
Disc. Amt:
Amount of Discount for the Sales Item will be calculated and displayed automatically as per the entered Discount Details. You can not change it. The system will take care of the type of discount which is percentage or value that should be considered.
Item Amt After Disc:
Automatically calculates and displays the Amount of Item after Discount. It is calculated as Item Basic Amt - Discount Amt. You can not change it.
Rate Stru Code:
Specifies the Rate Structure applicable for the Sales Item.
While 'Adding' a new Quotation, this field will automatically display the Rate Structure already entered for the Customer and Item through Item Customer Master option. You can change it. Click on the field to access a list of already existing Rate Structures defined through Rate Structure Master option. Select your desired Rate Structure from the list by scrolling down to it and pressing <ENTER>. Alternatively you can also enter the Rate Structure Code.
In case of 'Edit' and 'View', Rate Structure of the Sales Item will be displayed as per the selected Quotation. You can change it in 'Edit' mode.
You can not select a Rate Structure that has been deactivated through Activate/De-activate Master option in Administrator Tools Module. The help will also not display such Rate Structures.
As a result final price of the Item will be recalculated automatically and displayed in 'Item Amt After Disc, Rate Stru' field as -
Item Amt After Disc, Rate Stru = Item Amt After Disc + Rate Stru Amt
Once a Rate Structure is specified, a grid populated with Rate Codes included in that Rate Structure is displayed. Click here to read more about it.
Rate Stru Amt:
Rate Structure Amount is automatically calculated and displayed as sum total of all Rate Amount (in the Rate Structure Detail grid). You can not change it.
Item Amt After Disc, RtStru:
Final price of the Item will be calculated automatically and displayed as -
Item Amt After Disc, Rate Stru = Item Amt After Disc + Rate Stru Amt
You can not change it.
Item Type:
Displays the Type of Sales Item for your reference purpose. It can not be changed.
Status:
Automatically displays 'Open' in case Sales Order has not yet been received against this Quotation. Displays 'Order' if order has been received against it. You can not change it.
Remark/Item Note:
(Type : Alphanumeric, Length : 255)
Click on the field. Now enter the Remarks, if any related to the Sales Item. Press <TAB>.
Tag No:
(Type : Alphanumeric, Length : 255)
Click on the field. Now enter the Tags, if any related to the Sales Item. Press <TAB>.
Agent Comm. Type:
Denotes whether the Agent Commission in on Percentage or Value.
By default this field will display the Commission Type for the selected combination of Agent, Sales Item and Customer specified through Agent Commission Master option
In case Commission Type for the combination of Agent, Sales Item and Customer has NOT been specified through Agent Commission Master option, this field will display 'None'. You can change it by selecting the desired option from the given popup.
Agent Comm. V:
Denotes the value of Agent Commission.
By default this field will display the Commission Value for the selected combination of Agent, Sales Item and Customer specified through Agent Commission Master option
In case Commission Value for the combination of Agent, Sales Item and Customer has NOT been specified through Agent Commission Master option, this field will display 0. You can enter the value of the commission.
Delivery Period/Days?
Denotes the Number of days required for the delivery of the Sales Item.
While 'Adding'
a new Quotation, 'Delivery Period/Days'
already entered for the Sales Item through Sales Item Master : Product/Spare option will be displayed by default. You can change it. Click on the field to do so.
In case of 'Edit' and 'View', Delivery Period/Days of the Sales Item will be displayed as per the selected Quotation. You can change it in 'Edit' mode.
Equipment Attribute:
Please note that this field will be displayed only if 'Do you require Equipment Attribute' flag is set as 'On' through Sales Policy option of Administrator Tools module.
Click on the field. Another grid will be displayed as follows -

In case the Quotation is raised against an Inquiry, this grid will be populated with Equipment Attributes entered for the current Item of the selected Inquiry Number.
In case its a direct Quotation or new Sales Item is being added, this grid will be displayed empty.
Click on
Field Description of the grid -
Action
Click on the
Equipment Attribute Code:
Click on the field to access a list of already existing Equipment Attributes defined through Codes Master-Entry (Code Type="EA") option of Administrator Tools Module. Select your desired Equipment Attribute from the list by scrolling down to it and pressing <ENTER>. Alternatively you can also enter the Equipment Attribute Code. Press <TAB>.
Equipment Attribute description:
Name of the selected Equipment Attribute will be displayed automatically.
Equipment Attribute Value:
(Type : Alphanumeric, Length : 20)
Click on the field. Now enter the value of the selected Equipment Attribute for the Item.
Sales Item:
Automatically displays the Sales Item for which the Equipment Attribute is being entered.
Once done, click on 'OK' button to continue. As a result, the control will go back to the previous grid.
Product / Spare Size:
Automatically displays the size of the selected Item as entered through Item Master Basic Detail - Entry option of Materials module for your reference purpose. It can not be changed.
HSN/SAC Code:
Displays the HSN/SAC Code of the Sales Item as specified through Sales Item Master : Product/Spares or Sales Item Master : Service option for your reference purpose. It can not be changed.
Automatically displays the Additional Description associated with the currently selected Item as entered through Item Master Basic Detail - Entry option of Materials Module. You can NOT change it.
Automatically displays the Drawing No associated with the currently selected Item as specified through Item Master Basic Detail - Entry option of Materials Module. You can NOT change it.
Automatically displays the Drawing Revision of the Drawing associated with the currently selected Item as specified through Item Master Basic Detail - Entry option of Materials Module. You can NOT change it.

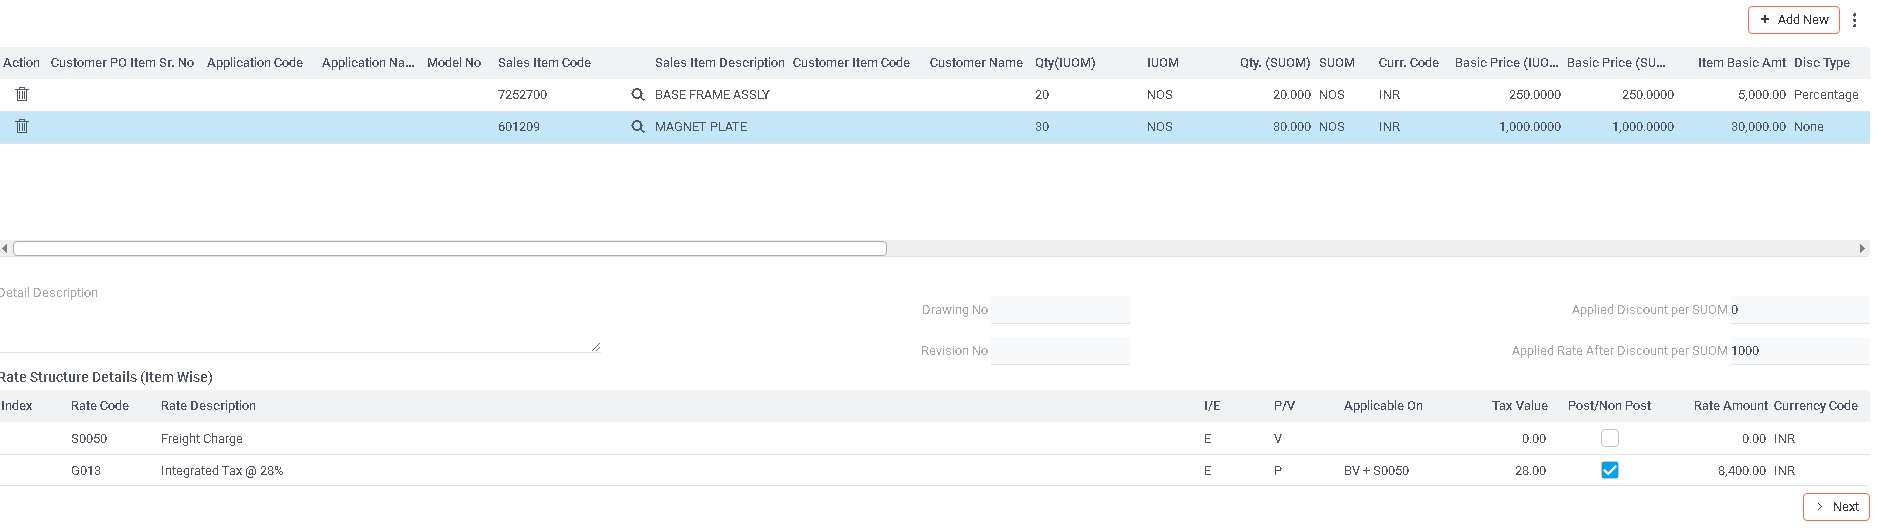
A grid populated with Rate Codes included in the selected Rate Structure as specified through Rate Structure Master option is displayed. Field Description of the grid -
Index:
Automatically generated sequence number.
Rate Code:
Automatically displays the Rate Code belonging to the Rate Structure for your reference.
Rate Desc:
Automatically displays the Description of the Rate Code belonging to the Rate Structure for your reference.
I/E:
Automatically displays whether the selected Rate Code is Included or Excluded as specified through Tax Rate Master - Entry option for your reference. It can NOT be changed.
P/V:
Automatically displays whether the value of the selected Rate Code is in Value or Percentage as specified through Tax Rate Master - Entry option for your reference. It can NOT be changed.
Applicable On:
Automatically displays the Rate Codes on which this particular Rate Code is applicable.
Tax Value:
Automatically displays the Value of the selected Rate Code as specified through Tax Rate Master - Entry option for your reference.
Post/Non Post:
Automatically displays whether the selected Rate Code is Postable or Non Postable in Purchase as specified through Tax Rate Master - Entry option for your reference. If it is Postable, the box will be displayed as checked otherwise it will be displayed empty.
Rate Amount:
In case of 'Percentage', the Rate Amount field in the grid is calculated automatically as % (enterered in Tax Value field) of Total Amount. In case of 'Value', the entered amount of tax is displayed.
Currency Code:
Automatically displays the Currency of the selected Rate Code as specified through Tax Rate Master - Entry option for your reference.

|
Please note that -
|
This grid displays details related to the last Sales Orders belonging to the current Item in the main grid. The number of last Sales Orders displayed, depends upon the number entered in the field 'How many records of last Sales/PO you want to display' through Sales Policy of Administrator Tools Module.
Please note that the Sales Orders belonging to default Customer will be displayed in a highlighted color.
This grid displays details related to the last Purchase Orders belonging to the current Item in the main grid. The number of last Purchase Orders displayed, depends upon the number entered in the field 'How many records of last Sales/PO you want to display' through Sales Policy of Administrator Tools Module.
Please note that the Purchase Orders belonging to default Vendor will be displayed in a highlighted color.
Click on  button to continue.

This section provides information on the Total Amount of the Quotation in domestic and foreign currency (if any) along with discounts offered on the whole.
In case of 'Edit' and 'View', details will be displayed as per the selected Quotation. You can change it.
Specifies the Discount offered on the Total Amount of the Quotation. While 'Adding' a new Quotation, Discount Type will be displayed as 'None' and Disc Value will be displayed as blank. In case of 'Edit' and 'View', Discount Type and Disc Value will be displayed as per the selected Quotation. You can change them.
Discount Type:
Select 'None', 'Percentage' or 'Value' from the given popup. Press <TAB>.
In case 'Percentage' or 'Value' is selected and discount has already been offered for one or more Items through Model Details and Rate Structure Details tab, IMMS will display an appropriate message informing the same. The user has the option to still continue with discount.
Discount Value (INR):
(Type : Numeric, Length : 9.2)
Enter the Percentage of Discount offered in case the Discount Type is chosen as 'Percentage'. Enter amount of Discount offered in case the Discount Type is chosen as 'Value'. No Discount will be accepted if 'None' is chosen as Discount Type.
Shows the Total Amount of Quotation after deducting the Order Level Discount from the Total Amount (after discount). You can not change any of the values.
Domestic Currency:
This field is calculated by deducting Order Level Discount from the sum of all 'Item Amt After Disc' for each Sales Item.
In case the Quotation is prepared in Foreign Currency, this field automatically converts the derived amount in Domestic Currency by taking into account the latest foreign exchange (selling rate) entered for that Foreign Currency through Exchange Rate Master Entry option of Administrator Tools Module.
In case the Quotation is prepared in Domestic Currency, the derived amount will be displayed as it is.
Customer Currency:
This field is calculated by deducting Order Level Discount from the sum of all 'Item Amt After Disc' for each Sales Item. It is displayed in the Customer's Currency.
Shows the Total Amount of Quotation after deducting the Order Level Discount from the Total Amount (after tax). You can not change any of the values.
Domestic Currency:
This field is calculated by deducting Order Level Discount from the sum of all 'Item Amt After Disc,Rate Stru' for each Sales Item.
In case the Quotation is prepared in Foreign Currency, this field automatically converts the derived amount in Domestic Currency by taking into account the latest foreign exchange (selling rate) entered for that Foreign Currency through Exchange Rate Master Entry option of Administrator Tools Module.
In case the Quotation is prepared in Domestic Currency, the derived amount will be displayed as it is.
Customer Currency:
This field is calculated by deducting Order Level Discount from the sum of all 'Item Amt After Disc,Rate Stru' for each Sales Item. It is displayed in the Customer's Currency.
Click on button to continue.

A list of Terms and Conditions defined through Codes Master Entry (Code Type = 'TS') option of Administrator Tools Module will be displayed in a grid as follows -

Field Description of the grid -
Action
Click on the
Term Code:
Displays the Code Type of the Terms Description for your reference. You can not change it.
Term Description:
Displays the Term Description for your reference. You can not change it.
Sub Term Code:
Displays the Sub Term Code for the Term Code.
While 'Adding' a new Quotation, this field will by default display the first Sub Term defined for the corresponding Term Code. You can change it.
In case of 'Edit' and 'View' modes, the Sub Terms Code will be displayed as per the selected Quotation Number. You can change it.
To change the Sub Term Code, click on the field to access a list of already existing Sub Term Codes defined for the corresponding Term Code through Codes Master Entry (Code Type = < current Term Code >) option of Administrator Tools Module. Select your desired Term Code from the list by scrolling down to it and pressing <ENTER>. Alternatively you can also enter the Term Code. Press <TAB>.
Sub Term Description:
Description of the selected Term Code will be displayed automatically.
Print Sequence:
Automatically displays the Print Sequence of the Term Code as specified through Codes Master Entry (Code Type = 'TS') option of Administrator Tools Module.
You can change it. To do so, click on the field. Now enter the print sequence for the Terms and Conditions. Please note that the entered sequence should be unique.
A list of Other Charges defined through Codes Master Entry (Code Type = 'CC') option of Administrator Tools Module will be displayed in a grid as follows -

Field description of the grid -
Action
Click on the
Charge Code:
Displays the Charge Code of the Charge Description for your reference. You can not change it.
Charge Description:
Displays the Charge Description for your reference. You can not change it.
Value:
Displays the Value for the Charge Code.
While 'Adding' a new Quotation, this field will be displayed as blank. Click on the field. Now enter the Value. Press <TAB>.
In case of 'Edit' and 'View', the Value will be displayed as per the selected Quotation Number. You can change it.
Click on button to continue.

In case of 'Adding' a new Quotation, all the fields will be displayed as blank.
In case of 'Edit' and 'View', values in all the fields will be displayed as per the selected Quotation Number. You can change them in 'Edit' mode.
(Type : Alphanumeric, Length : 60)
Enter the subject of the Quotation.
(Type : Alphanumeric, Length : 40)
A list of all Contacts available for the selected Customer specified through Customer Master option will be displayed automatically. You can click on the small arrow to view and select any of them. Alternatively, you can also enter the name of a new person to whom the Quotation is presented.
In case the Quotation is raised against an Inquiry, this field will by default display the name of the Contact Person mentioned in the selected Inquiry.
(Type : Alphanumeric, Length : 40)
If the existing Contact person has been selected, Designation of that person will be displayed automatically. And if a new Contact person has been entered, you can enter the designation of that person.
(Type : Alphanumeric, Length : 30)
If the existing Contact person has been selected, Contact Number of that person will be displayed automatically. And if a new Contact person has been entered, you can enter the phone number of that person.
(Type : Alphanumeric, Length : 44)
If the existing Contact person has been selected, Email id of that person will be displayed automatically. And if a new Contact person has been entered, you can enter the email id of that person.
(Type : Alphanumeric, Length : 20)
Enter the destination for which the Quotation has been created.
(Type : Alphanumeric, Length : 25)
Enter the name of the person who is authorized signatory for the Quotation.
(Type : Alphanumeric, Length : 25)
Enter the designation of the person who is authorized signatory for the Quotation.
Next a space will be displayed to enter extra remarks or notes.
In case of 'Adding' a new Quotation, this space will be displayed blank. You can enter as per your requirement.
In case of 'Edit' and 'View', data in this tab will be displayed as per the selected Quotation Number.
Enter the date by which the Quotation should be submitted to the customer. This date can NOT be before the Quotation Date.
This is Budgetary Quotation?Turn the flag 'On' by clicking on it in case the Quotation is for budget purpose. Otherwise keep it 'Off'. The Quotation will NOT be considered for budget purpose if the flag is 'Off'.
Denotes the current status of the Quotation.
Select either 'Not Submitted', 'Regret', 'Lost', or 'Cancel' from the given popup. Press <TAB>.
This field will be visible only when the Status of Quotation is selected as 'Not Submitted', 'Regret', 'Lost', or 'Cancel' . In case of 'Not Submitted', it will not be visible.
Denotes the Reason for the 'Regret', 'Lost', or 'Cancel' of Quotation.
Click on the field to access a list of already existing Reasons defined through Codes Master Entry (Code Type = 'RC') option of Administrator Tools Module. Select your desired Reason from the list by scrolling down to it and pressing <ENTER>. Alternatively you can also enter the Reason Code. Press <TAB>.
(Type : Alphanumeric, Length : 255)
This field will be visible only when the Status of Quotation is selected as 'Not Submitted', 'Regret', 'Lost', or 'Cancel' . In case of 'Not Submitted', it will not be visible.
Enter the Reason, if any, in case the Status of the Quotation is 'Regret', 'Lost', or 'Cancel'.
(Type : Alphanumeric, Length : 2500)
In case of 'Adding' a new Quotation, this space will be displayed blank. You can enter extra email ids on which Quotation has to be sent apart from the main email id.
In case of 'Edit' and 'View', data in this tab will be displayed as per the selected Quotation Number.
(Type : Alphanumeric, Length : 2500)
In case of 'Adding' a new Quotation, this space will be displayed blank. You can enter Remarks or Notes as per your requirement.
In case of 'Edit' and 'View', data in this tab will be displayed as per the selected Quotation Number.
Click on button to continue.

While 'Adding' a new Quotation, this grid will be displayed as empty.
In case of 'Edit' and 'View', this grid will be populated and displayed with Note details of the selected Quotation Number.
Click on button to enter more Notes in the grid. As a result, a new row will
added in the end of the grid.
Field Description of the grid -
Action
Click on the
Sr. No:
Automatically generated sequence number.
Notes:
(Type : Alphanumeric, Length : 255)
Click on the field. Now enter the notes. Press <TAB>.

This sections saves all the history of communication that has to be maintained for each Quotation.
In case of 'Adding' a new Quotation, all the fields will be displayed as blank.
In case of 'Edit' and 'View', values in all the fields will be displayed as per the selected Quotation Number.
Click on button to enter more Communication details in the grid. As a result, a new row will
added in the end of the grid.
Field Description of the grid -
Action
Click on the
Communication Date:
Denotes the date of Communication.
Today's date will be displayed by default but you can change it. To do so, click on the field. Now enter the date of Communication. It can NOT be later than the Quotation date. Press <TAB>.
Communication By:
Automatically displays the User Code of the person who has logged in to IMMS. You can NOT change it.
Name:
Name of the User Code will be displayed automatically.
Communication Description:
(Type : Alphanumeric, Length : 255)
Click on the field. Now enter the remarks. Press <TAB>.
Click on button to continue.

Click on button to continue.
Click on button to enter more Terms in the grid. As a result, a new row will
added in the end of the grid.
Once you have entered all the information related to the Quotation, click on 'Save' button to save it or 'Cancel' to discard. The control will go back to the list.
 button to finally authorize the selected records.
